Tuesday, November 27, 2012

If You Can't Buy it, Make It!

My boys love our flannel sheets we use in winter.  They care more about the seasonal print than they do the warmth of the flannel.  You can't find seasonal flannel sheets to fit a crib.  Thanks to Pinterest I have developed a very simple philosophy:  If you can't find it, make it.  I did just that.  Instead of hitting all the stores for electronic goods on Black Friday, I found myself at JoAnn's buying up fabric at great prices!  $1.47 a yard for flannel is the right price when you need 2 yards for each sheet.

I started with a fitted crib sheet tutorial from Dana Made It .  It is about as easy as any tutorial can be.  She has a few pictures of her steps.  I didn't take any pictures so if you're a visual person, like me, you'll want to check out her tutorial.  Here's a breakdown of the steps and pics of my final products.

What you'll need:
2 yards of fabric
2 yards of 1/4" wide elastic
Sewing necessities
30-45 minutes of time

Take your sheet and fold it in half.  Fold it in half again, making sure to line up your edges precisely.  Cut an 8x8" square out of the top corner with all the lose edges.  Next you want to  make your pockets for the corners of the mattress.  In each of the four corners you've cut out, line up the sides right sides together.  Sew them together to form the pocket.  Serge or zig zag stitch all the way around the edges to prevent fraying.  To make the casing for the elastic, iron down the edge of the fabric about a 1/3" all the way around. Sew it down all the way around leaving a 2 inch opening to thread the elastic.  Attach a safety pin on the end of the elastic and thread it through.  Once you get to the end, zigzag stitch it multiple times along the end so it holds.  Then close up the 2 inch opening.  Shift the sheet evenly around the elastic and put your made to order sheets on your mattress!


and....


First my first go at it, I couldn't be happier!  I tell you what, if there ever comes a time when I need to decorate another nursery, this gal is making EVERYTHING!!!  Why be limited by what's in the stores?  Not me!  Not anymore!

post signature

Monday, November 26, 2012

Holiday Cookie Swap 2

Welcome to the Holiday Cookie Recipe Swap...Blog Hop
(really it's a linky party)
(All these adorable graphics are done by Smitten Blog Designs)
Join us for all FOUR weeks of cookie features, recipes, and linky parties.
Here is the line up:
Sweet Boutique    November 20
The Domesticated Princess    November 27
Living, Loving, Crafting    December 11
Make sure you come back each week for a great new cookie recipe, plus each blog will be featuring their own favorite cookie links from the party!
This particular recipe took a bit of coaxing from my sweet husband to get it. It's one of my mom's recipes she makes every Christmas, and everyone loves it, so, of course, she was slow to part with it. However, I take after my dad when it comes to sharing and believe that if you have something worth sharing, you should share it. This recipe is definitely worth sharing!
 
I'm not sure of the cookie's origin, but my dad's parents had a lot of pecan trees on their farm, so when I was a child, there was an abundance of pecans every winter. I have fond memories of helping shell them. While the farm has long ago been turned into a neighborhood development with those trees now gone, my mom still manages to acquire bags of pecans from friends and family members every year, which means we can make lots of these cookies every winter! Whether you are given pecans or buy them from the store, I hope you'll try this recipe for Bertie's Pecan Snowball Cookies:
Ingredients:  
1 stick butter (margarine can work, but the butter makes it so much better!) 1 cup flour 1 cup finely chopped pecans 3 Tbsp. sugar 1 tsp. vanilla powdered sugar Pre-heat oven to 300. Soften butter, and mix with flour, pecans, sugar, and vanilla. Then roll into balls. (Ours are always about the size of traditional bouncy balls, so you can pop them in your mouth.) Bake at 300 degrees for 30-35 minutes. Roll them in a small bowl of powdered sugar while they are still very warm. This batch should make between 3 and 4 dozen cookies, depending on the size of the balls. I also wish I could tell you exactly how much powdered sugar to use, but we just guess each time. Start with a cup and add as you run low.
I hope you'll enjoy these cookies as much as my family does!
                                                                            -Bonny
After looking at all the yummy cookie recipes, I knew there was one I had to feature!  You just can't go wrong with a Candy Cane Oreo Stuffed Sugar Cookie!!!  Yum to the 10th power!  They look just as festive as they must taste!  Looking forward to trying this one out ASAP :)


Since each of the four co-hosts picked out her favorite cookie, be sure to check all four blogs to see them.
Don't forget to grab a button if you were featured!
sweet button
On to the party!
Please follow all four co-hosts.
This linky is for COOKIE RECIPE posts only, please!
Link up as many times as you want!  
This is a month long party so keep coming back for more recipes and features! 
 Each blog will be featuring their favorite links each week! 
(Make sure you get a button if you have been featured.)
I'll be sharing this post at some of these parties here.  


post signature

Wednesday, November 21, 2012

Twas the Night Before Turkey Day

Dinner has been eaten and cleaned up. Baths have been given.  Now we are snuggling on the couch, winding down for the evening basking in the glow of how I spent my day. 

That's right, y'all.  I put up my Christmas tree.  I know, I know.  Some of you are out there shaking your heads because my tree is up before Thanksgiving.  Normally I don't put up my tree until the day after.  This year I had to take advantage of the two sets of helping hands I had today.  One set to help me and the other to occupy my young.  Unfortunately things were still broken, but what can you do?! 

So we sit here next to our Christmas tree waiting for A Charlie Brown Thanksgiving.  Everyone is happy and in this moment, all is well!!


Monday, November 19, 2012

Holiday Cookie Recipe Swap 1


Welcome to the Holiday Cookie Recipe Swap...Blog Hop
(really it's a linky party)

(All these adorable graphics are done by Smitten Blog Designs)

Join us for all FOUR weeks of cookie features, recipes, and linky parties.

Here is the line up:

Sweet Boutique    November 20
The Domesticated Princess    November 27
Michelle's Tasty Treats    December 4
Living, Loving, Crafting    December 11

Make sure you come back each week for a great new cookie recipe, plus each blog will be featuring their own favorite cookie links from the party!


I know you guys are thinking, boring...a sugar cookie, really?  But, just hear me out on this one.


Not only is this the BEST sugar cookie recipe I have ever tried, just look what you can do with it.  Basic becomes beautiful with just a little effort.


I chose several different looks to share with you today.


Top left:  Royal icing topped with silver dragees.
Top middle:  Royal icing drizzle
Top right:  Fondant cut out
Bottom left:  Cream cheese icing with silver sprinkles
Bottom middle:  Royal icing topped with candy cane white chocolate bark
Bottom right:  Royal icing with a hand painted design topped with silver dragees.

When put together they make an elegant, special, and delicious holiday treat.

The Recipe
(This is from The Confetti Cakes Cookbook by Elisa Strauss)

2 1/3 cup plus 2 Tbs. All purpose flour
1 tsp. Salt
1 tsp. Baking powder
1 1/2 Sticks butter, unsalted
1/2 cup plus 2 Tbs. Sugar
1 egg
1 tsp. Vanilla extract

In a bowl sift together flour, salt, and baking powder.  In a mixing bowl cream butter and sugar until light and fluffy.  Add egg and vanilla and mix until combined.  Add half of the flour mixture and mix until combined.  Add the other half of the flour mixture and beat until combined.  I wrap the dough in plastic wrap and chill for at least an hour.  Roll out dough to 1/4 inch thickness.  Cut our cookies to desired shape and bake at 350 for 10 minutes.

If you have any questions on how I achieved these looks please feel free to ask.)

Sweet Holiday Wishes,
                                   -Stephanie

On to the party!

Please follow all four co-hosts.
This linky is for COOKIE RECIPE posts only, please!
Link up as many times as you want!  
This is a month long party so keep coming back for more recipes and features! 
 Each blog will be featuring their favorite links each week! 
(Make sure you get a button if you have been featured.)


post signature

Gobble, Gobble

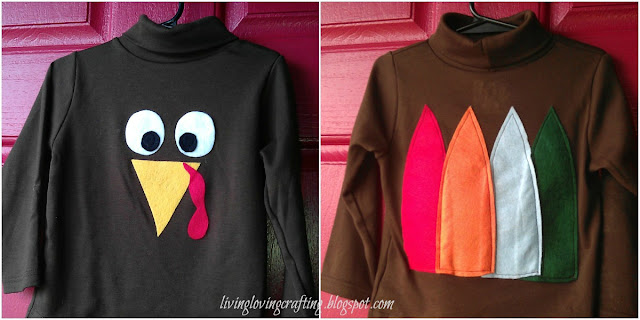
The boys are excited for Christmas but I  didn't want them to overlook Thanksgiving.  They were studying Thanksgiving and pilgrims this week at school.  I thought what better way to get them in the spirit than with their own turkey shirts!! 

I'd like to say I came up with this cute little idea, but we know exactly where I got it.  Pinterest!!  The Artsy Fartsy Mama has a quick tutorial that gave me the basic idea.  I got myself to the store for supplies and got to work.

Here's what you'll need:


Brown tshirt
Felt in different colors
Paper
Scissors
Wonder Under
Iron
Sewing supplies

Iron your shirt flat.  I used a brown turtleneck because it was the only brown shirt I found ANYWHERE in their size.  I have this fear of turtlenecks from my childhood for some reason and didn't want to see my kids in them, but it worked out. Set your shirt aside for now.

Get your paper and sketch out a feather, triangle for beak, a gobbler and a big and little circle for eyes.  This is how mine looked.  You can see it wasn't a perfect science, but I ended up with shapes I thought would work well.

I cut my shapes out of my cardstock and traced them on to my felt.  You could use thin paper and pin to your felt, but I liked this method best with felt.  Cut out your shapes from your felt.  I had a red gobbler, white big eye, black little eye, yellow beak and red, orange, blue and green feathers.  

Follow the directions on your Wonder Under to attach it to your felt pieces.  Arrange your feathers to your liking and use one big piece of Wonder Under so that it's a unit and easier to attach.  

Using your iron, attach the face first.  I attached the white circles, beak and gobbler.  I didn't use Wonder Under for the black eyes. After the shirt cooled off from the iron, I sewed the black eyes on.  I didn't sew anything else down for two reasons.  1.  I do not like sewing on felt and didn't want it to look messy.  2.  They were only going to wear it a few times and I knew the Wonder Under would be strong enough of a bond that they wouldn't tear it up.  You can do it either way.  

Attach the feather unit to the shirt using the iron.  I did want to reinforce the feathers with a quick stitch around the edges.  You can see here how close to the edge I got.  I did this around each individual feather to give it a cohesive look.

Here's the finished product.  They turned out so cute and the boys loved them.  That's all that really matters!!


What fun Thanksgiving crafts have you done this year?

Saturday, November 17, 2012

Holiday Cookie Recipe Swap

(all of the adorable graphic artwork is from Smitten Blog) 
Get your ovens warmed up and your mixers ready...it's time to bake. Join us for FIVE weeks of cookie features, recipes, and linky parties!
The holidays are right around the corner, and I can already smell the cookies baking in the oven.  Be ready for all your cookie exchanges,  baking parties,  and holiday gifts with our big, huge Holiday Cookie Recipe Swap.  Find all the great recipes you'll need for the holidays right here!
Sweet Boutique       November 20th Hi my name is Stephanie from Sweet Boutique.  I have a passion for baking, sweet treats, and parties!  I will be sharing my favorite sugar cookie recipe with you, great for any holiday or occasion.
The Domesticated Princess November 27th Hello! I'm Bonny from thedomesticatedprincess.com where I share recipes, craft projects, sewing tutorials, and a few personal stories as a mom of four silly but sweet children. I'm looking forward to sharing my mom's Pecan Snowball Cookie recipe, which is always a hit at holiday parties.


  Michelle's Tasty Creations        Dec. 4th Hi!  I'm Michelle from Michelle's Tasty Creations.  My passion is to cook, bake and occasionally share some crafts.  I also love to host parties and have family gatherings!  I'm looking forward to sharing my famous Cream Cheese Thumbprint Cookies with you.  The most requested cookie for the holiday season.

         The Face Behind LLCLiving, Loving, Crafting December 11th  I'm Jeannie from livinglovingcrafting.blogspot.com. I love staying home with my twin boys and I live to be creative. I will always find time to do something crafty!

We hope you'll spread the word by grabbing our button for your blog. We'll see you on Tuesday! 
Picture2-2

post signature

Tuesday, November 13, 2012

So Who's Ready For Christmas?

It's not even Thanksgiving yet and...
*The stores are loaded with Christmas stuff
*Two local radio stations are playing nonstop Christmas music
*Hallmark has started airing Christmas movies
*Christmas commercials have started
*Pinterest has been overtaken with Christmas food and crafts
AND...
I'M LOVING IT!!!

I have seen a few people boohoo over all of the above and I just giggle.  It is what it is and you might as well get in the spirit.  As a former high school choir member who had to start singing Christmas music before Halloween to prepare for our Christmas concert, I love that Christmas music is already available.  It helps get me in the mood.  I love that Christmas movies are on tv so that when I sit down at night to work on the Christmas gifts I am making, it gets me in the mood.  I love that my son has moved on from witches back to Santa because Christmas stuff is out.  I love the season and no matter the griping, I'm enjoying it!!  (I do not appreciate that stores are opening earlier on Thanksgiving, though.  I think that stinks a big one!)

My first Christmas craft went to my unborn nephew last weekend.  I was super proud of how it turned out!
Repeat Crafter Me had an adorable frosty crochet hat pattern floating around on Pinterest and I knew I had to make it.  The best part about how it turned out, my sister loved it.  Score!


This will be perfect for his newborn pictures in January!  What Christmas projects have you started on already??
post signature

Wednesday, November 7, 2012

DIY Lip Balm

So one of the favors we had at the Mustache Bash was homemade lip balm.  As soon as I saw it on Pinterest I knew I had to make it for the shower!!  Meet The Dubiens has a great tutorial that I followed.  It was super easy to make and with all the other things I needed to make, simple was just what I needed.

I must admit, I screwed up the first batch and had to make a second.  I wasn't paying full attention and it backfired on me.  Make sure your kool-aid hasn't clumped in the packet before adding it!!!!!!!  It won't dissolve if so.  

You'll need:
1 container of petroleum jelly/vasoline (approx. 1 cup)
1-2 packets of kool-aid
Lip balm containers (like these)
Microwave safe bowl

Empty your vasoline into a microwave safe bowl.  Microwave every 30 seconds, stirring between, until it becomes liquidy.  Add your kool-aid packet and stir until dissolved.  I learned it won't 100% dissolve.  There will be a few granules that you can still see, but that's ok.  They won't stain your lips.


I started with cherry but didn't like that all I could smell was vasoline so I added a grape packet also.  That was a bit stronger.  Once it's dissolved and before it cools back to a solid, fill your lip balm jars.  Don't fill all the way to the top.  If you do, when you put the lid on, it will squish out the sides.  Messy Messy!!


There you have it.  It requires several minutes to get the vasoline to the correct consistency and time to cool in their containers and that's about it.  Hosting any get togethers between now and Christmas?  This is a great "Thank you for coming" gift or even better, makes a great stocking stuffer!  I know I've started my "To Make" Christmas list, have you??

post signature

Tuesday, November 6, 2012

Mustache Bash


I am back from the land of party planning and let me tell you, it is a very scary place.  I loved planning a baby shower for my sister, but man, everything else seemed to fall by the wayside for the last week or two.  But, things are back to normal now and life resumes as usual.  Yay!!

I was very thankful that my cousin, April, and my sister's best friend, Casey, were so willing to help.  Together, we put on a fabulous Mustache Bash!!  (Photos courtesy of April)
Hot chocolate bar by Casey

Mustache cups and straws

Welcome sign

Homemade Lip Balm (tutorial coming soon!)

Attached to chocolate mustaches as a favor

Sign & prize bags (yes those are my cuties on the mantel)

Caleb sign

My beautiful sister!!

Working hard on Mad Libs

Laughing at the Mad Libs

The awesome diaper bag she received (made by yours truly)

I wanted this to be a different kind of shower.  We had an awesome dessert spread instead of lunch type food.  We had 6 prizes, four of which I made (necklace, clutch, two heating pads), an adorable mustache mug ("staching through the snow!)and a bottle of wine.  It all came together so well.  I was glad it was a success.  This baby is super loved already and won't want for anything.  January is almost here :)

(Can't wait to show you all the things I made her over the next several posts!!)
post signature